When I hear the phrase emergency shelter, I do not picture a giant cabin made in the woods with expert-level bushcraft skills. I picture something much more basic and much more important: a fast shelter that helps a person stay drier, warmer, and more protected from wind and weather until help arrives or conditions improve. The National Park Service says emergency shelter is one of the Ten Essentials because it protects people from severe weather and exposure, and it specifically lists a tent, tarp, bivy sack, or emergency space blanket as lightweight shelter options. NPS also notes that a tarp or thermal emergency blanket can serve as temporary shelter on a day trip.
That matters because, in many outdoor emergencies, the real danger is not “wild adventure.” It is exposure. The CDC says hypothermia can happen when the body loses heat faster than it can make heat, and the National Park Service warns that cool, wet, windy conditions can lead to hypothermia even in summer. Yellowstone’s safety guidance says that when someone is becoming hypothermic, the group should find shelter, get out of wind and rain, remove wet clothing, and get into dry layers.
So when I talk about building an emergency shelter with simple materials, I am really talking about solving four problems as quickly as possible: wind, rain, cold ground, and visibility for rescue. A good emergency shelter does not have to be pretty. It does not have to last for weeks. It just has to improve your situation fast enough to protect your body and buy you time. NPS guidance for lost or injured hikers also says that if you are in trouble, staying put, making yourself comfortable, and making yourself noticeable with a whistle, bright clothing, or a signal mirror are smart moves while waiting for help.
The first job is choosing a safer spot
Before I build anything, I would pick the site carefully. A bad location can make even a decent shelter fail. I would want a place that is out of strong wind, away from obvious falling branches, away from flood channels, and not directly beside rivers or lakes if conditions are cold and wet. Leave No Trace and National Park Service guidance also says to protect riparian areas by camping at least 200 feet from lakes and streams when possible, and to prefer durable surfaces and existing campsites rather than heavily altering a site.
For an emergency, I think of site choice as a quick safety checklist. Is the ground draining reasonably well? Is there some natural wind protection from a rock, hill, log, or thick trees? Am I avoiding low spots where cold air or water can collect? Is there enough nearby material to improve the shelter without wandering too far and getting more tired? These choices matter because NPS and CDC advice on hypothermia both point in the same direction: get out of the wind, get dry, and reduce further heat loss.
I would also keep one rescue rule in mind: if I am lost or injured, I should not keep roaming around unless there is a very clear safety reason to move. Big Bend National Park says that if you get hurt or lost, you should stay in one place to conserve water and energy, then signal for help. That is one reason shelter-building should happen close to where I decide to stay. A shelter protects me, and my location becomes easier for rescuers to search if I stop wandering.
Keep it small, because small shelters are easier to warm
This is one of the most important beginner ideas. A tiny shelter is often better than a roomy one. I do not want to build a big structure that takes forever and traps a lot of cold air. I want to build something just large enough for my body or my group to fit with as little empty space as practical. The goal is not comfort like a backyard fort. The goal is protection from exposure.
Why does that help? Because smaller shelters are faster to build, easier to cover, and easier to make warmer with body heat and dry insulation. NPS guidance for hypothermia stresses getting people into shelter, dry clothing, and something warm around them, and Rocky Mountain National Park adds an important point: make sure there is a barrier between the person and the ground. That shows how much heat can be lost downward as well as outward.
So I would think of the shelter as two separate jobs. The roof and walls handle wind and rain. The bedding or ground layer handles heat loss to the earth. A lot of beginners pay attention only to the roof, but the ground can steal warmth very quickly, especially if it is cold, wet, or snowy.
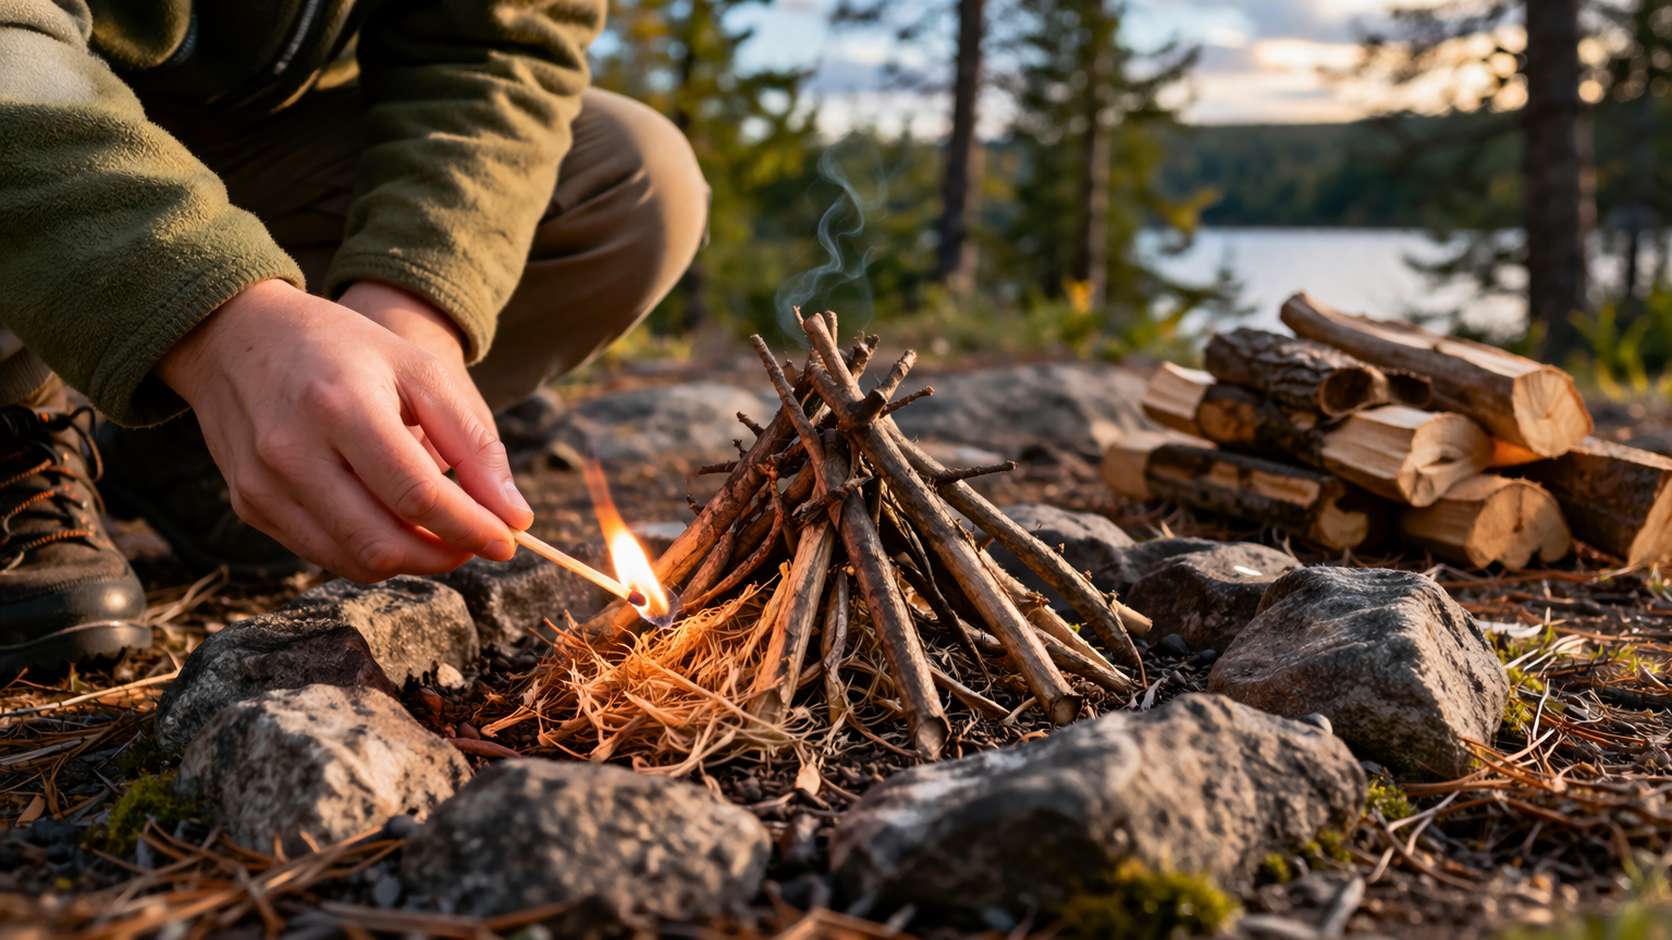
The easiest emergency shelter is usually a tarp shelter
If I have a tarp, poncho, emergency blanket, or even a large plastic sheet, I already have a head start. The National Park Service lists tarps and emergency space blankets as lightweight emergency shelter options, and several park safety pages recommend carrying them for unexpected nights or weather changes.
A simple tarp shelter works because it gives me quick overhead cover and wind protection with very little effort. I can tie one edge between two trees, stake or weigh down the other edge with rocks, and make a slanted roof. I can also drape it lower on the windy side to make a fast lean-to shape. The exact shape matters less than the basic purpose: angle it to block weather, keep it secure, and make sure water runs away from where I am sitting or lying down.
What I like about tarp shelters for beginners is that they are forgiving. I do not need perfect knots or fancy design. I need a stable cover that will not blow away. NPS emergency-planning guidance for Grand Teton says an emergency blanket, tent, or tarp can be laid out to help make a stranded person more visible from above, which is another useful bonus. A shelter made from bright or reflective material can both protect me and help rescuers find me.
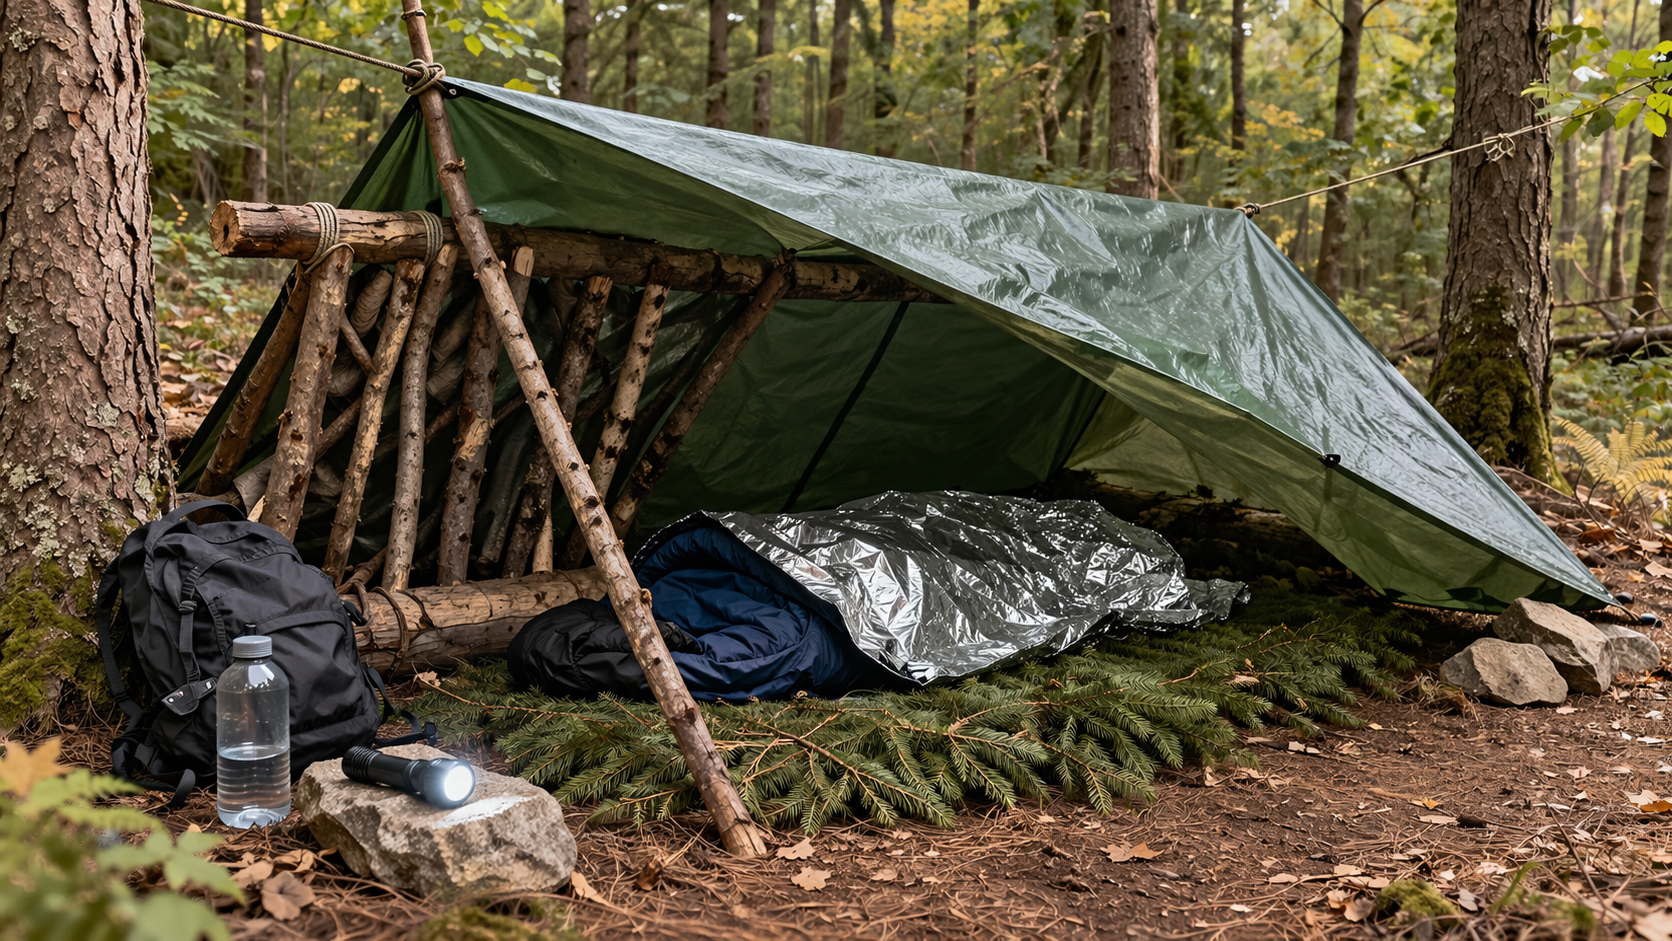
If you do not have a tarp, use a simple lean-to
If I do not have manufactured shelter material, I would usually try a lean-to before trying anything complicated. A lean-to is basically a slanted wall or roof that blocks wind and weather on one side. It can be made by resting sticks or branches at an angle against a fallen log, a ridge branch, or a horizontal support between two points. Then I would layer on smaller branches, leafy material, grasses, or other natural cover to thicken it.
I think this is a good beginner shelter because the idea is easy to understand: one strong angle, one protected side, quick overhead cover. It is not the warmest possible shelter, but it can be much faster to build than enclosed designs. In an emergency, speed matters. Yellowstone’s backcountry safety advice says to alter your plans, find shelter, and make camp while you still have energy. That is a smart reminder that a shelter started early is usually better than a “better” shelter started too late.
A lean-to works best when I face the closed side toward the bad weather and keep the opening away from the wind. I would also add a thick ground layer underneath me. Even a great roof will not help enough if I am lying directly on cold, wet soil. Rocky Mountain National Park’s advice to place a barrier between the person and the ground is one of the best short survival tips I have seen.
Build the bed as seriously as you build the roof
This might be the most overlooked part of an emergency shelter. I would spend real effort on the ground layer. Leaves, pine needles, dry grass, evergreen boughs, spare clothing, a foam pad, a backpack, or any dry material that creates separation from the ground can help. The point is not softness. The point is insulation.
The CDC says hypothermia care includes getting a person into shelter and removing wet clothing, and NPS adds that the person should have a barrier between themselves and the ground. That means a ground layer is not just a comfort feature. It is part of staying warm enough to think clearly and keep functioning.
If conditions are wet, I would make the bed higher and thicker than I think I need. If I have a tarp or plastic, I would try to keep it under or around the bedding in a way that helps block moisture, but I would still want insulating material above the plastic if possible. Plastic alone may block water, but it does not provide the warmth that a dry insulating layer can. The real pattern is simple: dry, then thick, then sheltered.
A debris shelter can work, but speed still matters most
One classic emergency option is a debris shelter made from natural materials like branches, leaves, grass, and brush. I think of it as a small frame with a heavy coat of natural insulation piled over it. These shelters can be useful because they trap warmth and break the wind well, especially if the opening is small. But for beginners, I think the danger is spending too much time trying to make the “perfect” wilderness shelter while getting colder and more tired.
So I would only choose this route if I had enough energy, enough daylight, and enough dry material nearby. The shelter still needs the same basics as every other design: good site, small size, weather protection, and a thick insulating bed. The specific shape matters less than whether it is actually helping me stay dry and warm. Yellowstone’s advice to make camp while you still have energy is especially important here.
For younger beginners, I honestly think a simple lean-to with a thick bed is often a better learning starting point than trying to build a fully enclosed debris hut the first time under pressure.
In cold weather, staying dry matters as much as the shelter itself
A shelter cannot do all the work by itself. The CDC says wet clothing chills the body quickly, and both CDC and NPS guidance say to remove wet clothing and get into dry layers when treating or preventing hypothermia. Great Smoky Mountains National Park also warns hikers to put on rain gear before they get wet.
That means if I were building an emergency shelter in rain, snow, or cold wind, I would also be thinking hard about my clothing. I would protect my head, hands, and core, and I would use dry layers or blankets inside the shelter if I had them. NIOSH’s cold-stress guidance also recommends several loose layers, protection for ears, face, hands, and feet, and extra dry clothing like socks and gloves.
This is why I do not like the movie idea that a shelter is a magical answer all by itself. In real life, the best emergency shelter is part of a small system: shelter, dry clothes, insulation underneath you, and a plan to signal for help.
Make the shelter easy for rescuers to find
This part is very important. If the emergency is serious, I want rescue, not a long-term wilderness challenge. National Park Service pages recommend whistles, signal mirrors, bright clothing, and even making a large visible “X” on the ground in some remote areas. Grand Teton’s outdoor emergency plan also says to pack a whistle and use shelter material like an emergency blanket, tent, or tarp to make yourself more visible.
So I would not hide my shelter unless there were a direct safety reason to do so, such as extreme wind. I would think about visibility from trails, clearings, or the air. A bright tarp is excellent for this. A whistle is also a smart tool because it takes less energy than shouting. Some NPS sites note that three short whistle blasts are a recognized distress signal.
This rescue mindset changes how I think about the whole project. I am not “moving into the woods.” I am making a temporary protective spot where I can stay safer and easier to find.
What simple materials help the most
For beginners, I think the most useful simple materials are the ones already recommended in park safety lists and the Ten Essentials. These include a tarp, emergency blanket, bivy, poncho, cord, whistle, extra clothing, warm layers, and a flashlight or headlamp. NPS and Ready.gov both include whistles on their emergency supply lists, and NPS repeatedly recommends lightweight shelter materials as part of basic preparedness.
Natural materials can help too: branches for a frame, leaves or pine needles for insulation, grasses for covering, and logs or rocks for windbreak support. But I think the best beginner lesson is that even one small man-made item can make shelter-building much easier. A simple tarp or emergency blanket weighs very little and can turn a hard night into a much safer one. That is exactly why NPS includes those items in the Ten Essentials.
What not to do
I think beginners should be careful about three common mistakes. First, do not wait too long. Building late, after dark, wet, exhausted, or already shivering is much harder. Yellowstone’s advice to make camp while you still have energy is worth repeating.
Second, do not ignore the ground. A person can have a roof and still lose too much heat to the earth. The barrier under you really matters.
Third, do not treat fire as your only answer. Fire can help in some situations, but weather, fuel, regulations, and safety can all limit whether it is practical. Shelter and insulation should come first because they work even when fire is not possible. Leave No Trace also emphasizes care with campfire impacts and existing fire rules.
I would add one more caution: do not turn a simple survival problem into a bigger one by overbuilding, wandering too far for materials, or taking risks around unstable trees, cliffs, flood-prone washes, or freezing water.
The best emergency shelter is the one you can build fast
That is really the heart of it for me. The best emergency shelter is not the fanciest design. It is the one I can put together quickly, safely, and well enough to reduce exposure right away. National Park Service guidance makes clear that emergency shelter is a core survival item, and CDC guidance makes clear that getting into shelter, out of wet clothes, and away from wind is a major part of preventing or responding to hypothermia.
So if I were teaching this to a beginner, I would keep the message simple. Use the easiest materials first. Choose a safer site. Keep the shelter small. Block wind and rain. Insulate yourself from the ground. Stay dry. Signal for help. And build sooner than you think you need to. Those are the basics that actually matter.
In other words, an emergency shelter is not really about construction. It is about protection. And for a beginner, that is very good news, because protection can be built with simple materials, calm choices, and a focus on what the body needs most.
Related SurviveHack guides
Keep building your practical plan with keep food cold during a power outage and what to do when the power goes out at night. These internal links make it easier to move from one emergency task to the next without hunting through the site.
Official guidance note
For safety-sensitive decisions, compare this guide with Ready.gov preparedness planning and local instructions for your area. SurviveHack articles are practical informational guides, not a replacement for emergency, medical, legal, or public safety direction.